• Home
  • Contact
  • Residential
  • Commercial
  • Interior Design
  • Galleries
  • Testimonials
  • Videos
  • Blog
Menu

Best of NJ General Contractors | CnS Contracting, LLC

Street Address
Tinton Falls, NJ, 07724
(732)996-5577
Extraordinary Home Remodeling
Call today for a free estimate!

Extraordinary Home Remodeling

(732) 996-5577

Best of NJ General Contractors | CnS Contracting, LLC

  • Home
  • Contact
  • Services
    • Residential
    • Commercial
    • Interior Design
  • Galleries
  • Testimonials
  • Videos
  • Blog

How to Install a Frost-Proof Outdoor Faucet

October 30, 2013
frozenpipe1.jpg

Don't have to deal with bursting pipes this winter. Install a frost-proof faucet.

Call for local Plumbing Rules

You'll generally need:

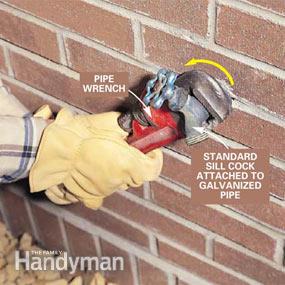
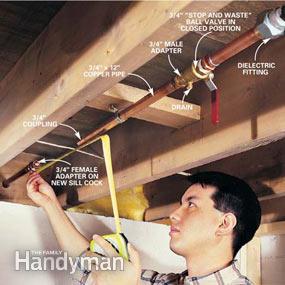
    -3/4-in pipe and sillcock
    -vaccuum breaker that attaches to the sillcock, or a siphon-preventative sillcock
    -shutoff valve (a.k.a stop valve) 
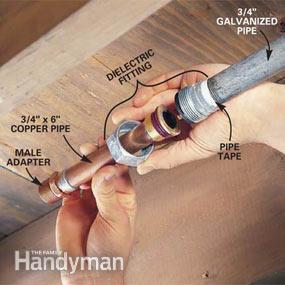
    -if you're switching to copper pipe, you'll need a special dielectric fitting for corrosion prevention. 


      frozenpipe2.jpg

      Make a Parts List

      forzenpipe3.JPG

      Measure your existing plumbing, and make a new plumbing layout for a material list. Draw where the pipe and fitting go; indicate whether a part has threaded, sweat, or solvent-welded joints, labeling size and description
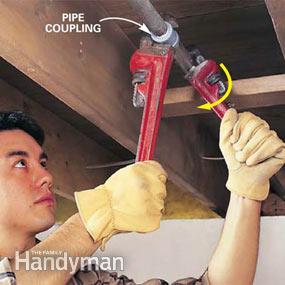
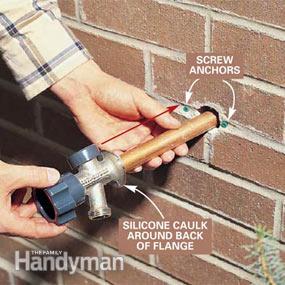
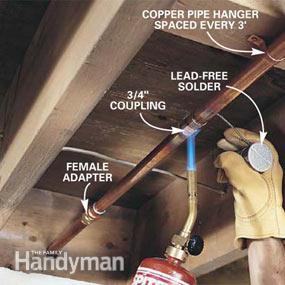
      Assembly

       
      Remove the Old Faucet
      Remove the Old Faucet

      Turn off either the water shutoff valve to the existing sill cock or the main water supply. Open the sill cock and drain the water from the line. Remove the old sill cock by positioning a pipe wrench at the back of the sill cock and turning the wrench counterclockwise. Have an assistant use a pipe wrench to hold back the sill cock supply line inside to prevent sections of pipe from unscrewing.

      Turn off the Next Pipe
      Turn off the Next Pipe

      Unscrew the old pipe at the joint closest to the outside wall. Hold one side stationary with one pipe wrench and twist off the pipe with the other. Remove as many couplings and pipes as needed to fit in the new assembly

      Insert new Sillcock
      Insert new Sillcock

      Bore a 1-1/8 in. hole (if the hole needs enlarging) for the new sill cock using a masonry hole saw. Dry-fit the sill cock in an upright position tight against the wall and mark the location of the fastening holes. Drill two 1/4-in. holes with a masonry drill bit and push the plastic screw anchors in flush to the wall. Apply a thick bead of clear silicone around the back of the sill cock flange, push it against the wall and fasten it with two 1-1/4 in. No. 8 roundhead brass screws.

      Attach Dielectric Fitting
      Attach Dielectric Fitting

      Disassemble the dielectric fitting and solder one end to a 6-in. copper pipe. Cool the pipe and reassemble the fitting. Then solder the copper male adapter to the other end. Apply pipe tape to the threads of the galvanized pipe and tightly screw the dielectric fitting to the pipe.

      Assemble Pipe and Fittings
      Assemble Pipe and Fittings

      Apply pipe tape to the male adapter threads on the 6-in. pipe and screw the “stop and waste” ball valve to it. The water flow direction arrow on the valve must point toward the sill cock. Solder a male adapter to a 12-in. copper pipe, apply pipe tape to the adapter threads and screw it into the other side of the ball valve. Temporarily screw a female adapter to the sill cock and slide a female coupling halfway onto the end of the 12-in. pipe. Then measure the distance between them, add 1 in. and cut a section of 3/4-in. copper pipe to fit.

      Sweat the Copper
      Sweat the Copper

      Remove the female adapter and solder it to the last copper pipe. Then apply pipe tape to the male threads, and screw the adapter onto the sill cock. Solder both copper pipes into the coupling. When sweating the copper joints, open the sill cock, hold the torch on one side of the connection and the lead-free solder wire on the other side. Heat the joint for 10 seconds until the solder melts and flows around the connection.

       
      ← How to Install Radiant Floor HeatingSuperstorm Sandy - One Year Later →
      Welcome!
      Categories
      Announcements
      Bathroom
      DIY
      Design
      Festive Creations
      Fun
      Kitchen
      Outdoor
      Recipies
      Tips

      Subscribe to blog updates! Enter your email address:

      Delivered by FeedBurner

      As part of a construction team based in Monmouth County, NJ,  I focus on design and project management for the team. This blog is intended to share what’s on my mind, our projects, all things that inspire and tidbits that might make everyday li…

      As part of a construction team based in Monmouth County, NJ,  I focus on design and project management for the team. This blog is intended to share what’s on my mind, our projects, all things that inspire and tidbits that might make everyday life a little easier for some. Thanks for reading!

             Molly Mangan

      I'm a junior carpenter and a computer programmer. I focus on all tech aspects of CnS. I hope this blog will help bring your projects to life.

      I'm a junior carpenter and a computer programmer. I focus on all tech aspects of CnS. I hope this blog will help bring your projects to life.

      Devin Hayes
      CnS Contracting, LLC

      Tweets by @CnSContracting
      Click for the BBB Business Review of this Construction & Remodeling Services in Tinton Falls NJ
      C n S Contracting, LLC is Top Rated in Eatontown
      Top Rated Addition & Remodeling Contractors in Eatontown
      angies list.png
      NJBIA2.jpg
      Remodeling and Home Design
      CnS Contracting, LLC
      #1 Contractor at the Jersey shore, located in Tinton Falls, NJ. Browse our galleries
      and contact us for an estimate today! (732) 996-5577. Tinton Falls, NJ 07724
      License #13VH05756300

      Hit Counter