• Home
  • Contact
  • Residential
  • Commercial
  • Interior Design
  • Galleries
  • Testimonials
  • Videos
  • Blog
Menu

Best of NJ General Contractors | CnS Contracting, LLC

Street Address
Tinton Falls, NJ, 07724
(732)996-5577
Extraordinary Home Remodeling
Call today for a free estimate!

Extraordinary Home Remodeling

(732) 996-5577

Best of NJ General Contractors | CnS Contracting, LLC

  • Home
  • Contact
  • Services
    • Residential
    • Commercial
    • Interior Design
  • Galleries
  • Testimonials
  • Videos
  • Blog

How to Repair a Toilet

October 16, 2013
toilet1.jpg

Save a call to the Plumber and fix your toilet tonight.

Check for Leaky Flange

toilet2.jpg

If you have a puddle of water where the floor meets the toilet or if that area feels spongy, you probably have a bad seal between your toilet horn and drain line. Small leaks will eventually rot your floor and framing

Pick up Materials

New Wax Ring

Two sets of 5/16-in water closet bolts

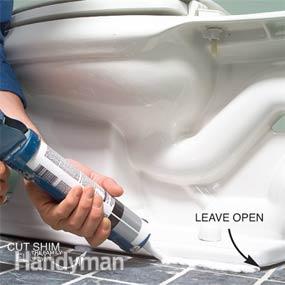
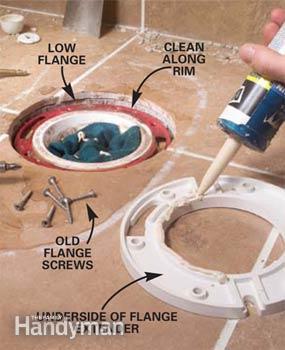
Tube of silicone-based caulk

Plastic toilet shims

toilet3.jpg

Pulling the Toilet

Remove the Toilet
Remove the Toilet


Unscrew the nut that connects the water supply line to the bottom of the tank. Reach inside the tank with a long-handled screwdriver to hold the bolts while you loosen the nuts underneath with a wrench. Lift the tank from the bowl, then lift the bowl free of the floor.

Loosen the Bolts
Loosen the Bolts

Unscrew the water closet nut with a wrench. If the bolt spins along with the nut, grab the exposed bolt above the nut with locking pliers. Loosen the nut just enough to squeeze in a hacksaw blade below the nut and saw through the bolt. TIP: Use a close-quarters hacksaw like the one shown or wrap a rag around a bare blade.

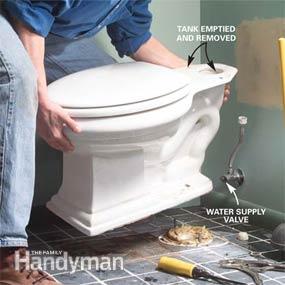
Before pulling the stool, shut off the water supply valve and remove the water line leading to the tank (photo 2). after flushing the toilet, look in the tank and listen for water. If it's still running, you'll have to shut off the water main and replace the valve. Then sponge out the excess and take off the toilet.

Clean Up Around the Drain

Scrape off all old wax with a putty knife and clean old caulk and debris.

To determine what to do next, check if you have a broken flange (photo to the right) or a flange that's more than 1/4-in below the finished floor (next step). Rot may also be around the flange (following step). If nothing appears to be wrong, just adding the new wax ring may fix it (last step).  

toilet5.jpg

Broken Toilet Flange

Screw on the Ring
Screw on the Ring

Screw the ring into the floor, slide the water closet bolts into the slots, and snug down the water closet nuts using the nuts and washers from an extra set of toilet flange bolts. That'll keep bolts from tipping or wobbling while you're resetting the toilet. Scrape away the excess caulk and let the caulk cure overnight before setting the toilet

Caulk
Caulk

Lay a bead of silicone caulk around the perimeter of the toilet flange.

Prep for New Parts
Prep for New Parts

Thoroughly clean off wax residue with mineral spirits. Set a reinforcement ring over the flange so the water closet bolt slots line up and mark screw locations on the floor. Drill a clearance hole through tile or masonry with a hammer drill and a 1/4-in. masonry bit. Stop when you reach the subfloor.

Old cast iron and plastic commonly break, caused by rocking or overtightening. Look for a cracked rim on the outside of the bolt slots. If it's broken, install a reinforcement ring with six 1.5-in No.8 oval-head stainless steel screws. If the flange is concrete, use 1-1/4 inch flathead concrete screws and masonry drill bit. 

Sunken Toilet Flange

A new floor can be an inch or more above the existing flange. Doubling the was ring isn't a good idea. Add plastic toilet flange extenders. Extend the flange until it falls between 1/4-in below and above the finished floor

Screw in Ring
Screw in Ring

Line up the holes of the extender ring with the flange holes and screw both parts into the floor with No. 8 x 1-1/4 in. stainless steel screws. Wipe away excess caulk and reset the toilet (Photos 11 – 14).

Prep for Extender Ring

Clean the toilet flange with mineral spirits to remove all the excess wax. Fit the extender ring over the flange and remove any original flange screws that line up with the ones in the extender ring. Apply a bead of silicone caulk around the inside edge of the extender ring.

Flange Rot

Remove Old Flange
Remove Old Flange

Remove the old toilet flange screws and slip each half of the flange support beneath the flange edges. Lift the flange with a screwdriver or pry bar if necessary.

Install Flange Support

Anchor the flange support to the subfloor and then drill 1/8-in. pilot holes through the support in the four holes closest to the flange bolt slots. Run additional screws through the flange into the support and reset the toilet.

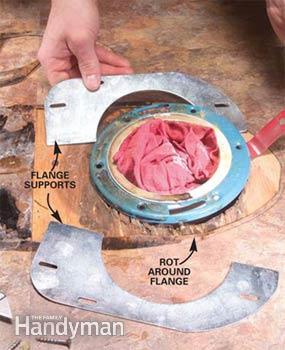
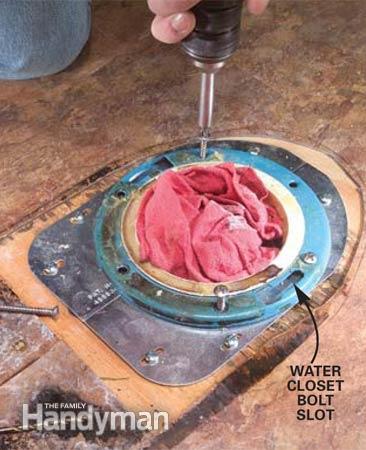
A leaky flange can cause rot. Remove the old flange and inspect the damage. If it's small and contained, you can buy a support bracket to transfer the load past the subfloor, otherwise you'll have to cut out the rot. and replace the damaged framing/subfloor/finished floor.
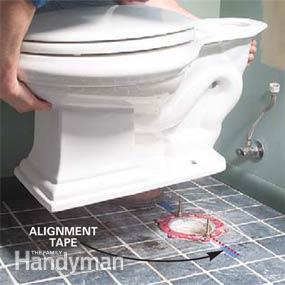
Fix the Rock

A common cause for a leaky toilet is because the wax ring lost it's seal. That could be because the toilet rocks when you sit on it. Reset the toilet, using shims if the floor is uneven, and replace the wax ring if it's broken. Finish by caulking around the toilet.

Install Shims
Install Shims

Slip the bolt cap washers over the bolts, then snug down the water closet washers and nuts with a wrench. Be careful not to overtighten the nuts, especially over gaps between the toilet and the floor. Slip toilet shims under any toilet edge gaps and cut off the excess length. Some shims are pretty tough. If a utility knife won't cut through the plastic, you may have to chop them off with a sharp wood chisel.


Reset the Toilet
Reset the Toilet

Align the bolt holes with the masking tape and lower the toilet bowl straight over the bolts. Push down on the rim of the toilet to seat the wax ring, then close the lid and sit on the toilet for a few minutes to force the toilet all the way to the floor. Stop when the porcelain surface rests on the finished floor.

Install New Wax Ring

Push the new wax ring onto the toilet horn with the rounded side toward the toilet. Mark the water closet bolt positions on the floor with masking tape.

Apply Caulk
Apply Caulk

Caulk around the toilet base with silicone caulk, leaving the back end of the base uncaulked. The gap leaves a space for moisture under the toilet to escape. (Some local codes require caulk around the entire base.)

← Improve Toilet PerformanceHow to: Refinish a Bathtub →
Welcome!
Categories
Announcements
Bathroom
DIY
Design
Festive Creations
Fun
Kitchen
Outdoor
Recipies
Tips

Subscribe to blog updates! Enter your email address:

Delivered by FeedBurner

As part of a construction team based in Monmouth County, NJ,  I focus on design and project management for the team. This blog is intended to share what’s on my mind, our projects, all things that inspire and tidbits that might make everyday li…

As part of a construction team based in Monmouth County, NJ,  I focus on design and project management for the team. This blog is intended to share what’s on my mind, our projects, all things that inspire and tidbits that might make everyday life a little easier for some. Thanks for reading!

       Molly Mangan

I'm a junior carpenter and a computer programmer. I focus on all tech aspects of CnS. I hope this blog will help bring your projects to life.

I'm a junior carpenter and a computer programmer. I focus on all tech aspects of CnS. I hope this blog will help bring your projects to life.

Devin Hayes
CnS Contracting, LLC

Tweets by @CnSContracting
Click for the BBB Business Review of this Construction & Remodeling Services in Tinton Falls NJ
C n S Contracting, LLC is Top Rated in Eatontown
Top Rated Addition & Remodeling Contractors in Eatontown
angies list.png
NJBIA2.jpg
Remodeling and Home Design
CnS Contracting, LLC
#1 Contractor at the Jersey shore, located in Tinton Falls, NJ. Browse our galleries
and contact us for an estimate today! (732) 996-5577. Tinton Falls, NJ 07724
License #13VH05756300

Hit Counter